Sunday, May 8, 2016

Complete Plastic Models: Academy 1/72 AH-64 Apache


After the Vietnam War the United States Army came to a conclusion that although the Bell Huey was a success for transporting troupes from a base to the battle ground, it wasn’t the best option for loitering around the battlefield and supplying help to ground troupes and their targets. Originally produced by Hughes Helicopters, later being a McDonnell Douglas helicopter, the AH-64 Apache was the answer for this need of a helicopter that could supply support for ground troops on the battlefield as well as attack enemy targets with great precision. The first real test of action for the Apache, besides its deployment in Europe in 1987, came during the Gulf War in 1991. With its capability of flying at night with advance night vision and weapon system locking ability, the Apache proved to be a reliable friend to the allied ground troops as was the A-10 Warhog.
   

This build started like most models, with the cockpit construction first, with a decent raised detail of the instruments and panels in the cockpit area I opted to not use the supplied decals to depict the look of the interior. Sections of the panels were painted flack black and then dry brushed with a gunmetal metallic paint. The helicopter was built completely box stock as per the instructions included in the kit with the exceptions of the decals not used in the cockpit area, some aftermarket decals for the Apaches markings, and the grab irons on the helicopter were replace with custom bend ones instead of the flimsy plastic ones. The clear parts were dipped in Pledge Future Floor Polish and the Bare Metal foil was used to mask them off. The Apache was sprayed first with Tamiya white primer and the Tamiya Olive Drab. The props were masked off and sprayed with Tamiya matt black. Once the model had its glass cote applied, it was then decaled. The Hellfire missiles received special attention; the original front was carefully cut off and replaced with MVP clear lenses. The lenses were then coated with Tamiya clear yellow to simulate the UV protection on the real lenses for the front sensors. The aftermarket decals used come from Microscale and Hasegawa from my spare decal box. The last items to add to the model were the “Remove Before Flight” tags on the hard points of the helicopters wings, these are photo-etch and from Eduard. This was a great model to build surprisingly. I never really like too many of the Academy kits in this scale but the past three I have done, The OV-10 Bronco, A-36 Dragon Fly, and this one, have been a joy to build. TRWBM   

Thursday, March 3, 2016

Completed Model Railroading Projects: Northern Pacific PS 4750 Covered Hopper in HO Scale

     There is a lot that can be said when it comes to the history of covered hoppers in North American railroading, I will give you a brief overview to get the ball rolling. A great book on the topic of covered hoppers and their primary use; grain hauling is in the book by Jeff Wilson The Model Railroader’s Guide to Grain from Kalmbach Publishing During the middle of the 20th century freight car manufactures in North America began developing rail cars with increased load capacity for shipping. One of the most successful designs was one for hauling dry goods such as grain, salt, wheat, and flour. This 4750 cubic foot design from Pullman Standard became a very popular buy for most class I railroads and a few short lines when new. Now is where it gets interesting for this project for me, as I was looking through photos of the prototype for these cars it became apparent that the Northern Pacific never had the 4750 cubic foot sized cars on their roster because they were offered after the 1970 Burlington Northern merger. With that said, these cars is are “fudged” cars in the way that they have been numbered in the correct series but they have numbers that would represent the slightly smaller capacity of 4427 cubic feet. The spotting difference is the amount of vertical ribs on the side of the cars, thirteen for the smaller capacity and eighteen for the 4750 cubic foot design. I can live with this slight flaw because these are in fact some really nice looking rail cars when they are completed and weathered, now onto the work put into these two covered hoppers.


     These were assembled by following the included instructions but nearly all of the parts were weathered with Floquil “Weathered Black” before they were glued together to help with reaching some of the trickier spots like the ends of the cars. The brake rigging was drilled out to accommodate air pipes and the lines were custom bend by following prototype photos. On each of the ends of the cars air hoses from Hitech Details and Details Associates cut lever bars were installed. Once the cars were fully assembled, I switched my focus to the trucks and wheels for these cars. I wanted to do something a little different and I installed 100 ton trucks with 36” wheels from Athearn Genesis, these trucks feature rolling wheel bearings which look really cool up close. The outer sides of the wheels were painted with Tamiya paint to similar rust on the wheels. The truck side frames were then weathered using Tamiya semi-wet powders. The cars were also gloss coted once completed so that the surface could accept the small decals like consolidated lube plates, reweight stencils, and ACI tags. Once the decals were all in their proper places, the cars received a final dull cote spray to finish the models off. I really like these car kits from Accurail, they make great inexpensive filler for large unit grain trains and only take about an hour per car if you do the extra detailing. TRWBM.

Monday, February 1, 2016

Completed Model Railroading Projects: Detroit and Toledo Shore line 86 foot Boxcar in N scale

The Pullman Standard design 86 foot Auto Parts Boxcar is an important one for railroading and shipping innovation. With its great capacity and quality design, it became a staple for the auto industry until the more recent utilization of the 53 foot container. This car design being so large, often, offered railroads with a large canvas to advertise their company logo or slogan for happy rail fans to see.  The Detroit and Toledo Shore Line is no different to this trend. From the information that I was able to gather from Kalmbach Publishing’s book The Historical Guide to North American Railroads Third Edition the Detroit and Toledo Shore line offered a bridge line between the two cities for its different owners through the years; Grand Trunk and Western, Nickel Plate, and Norfolk and Western, to name a few.


This car started as a factory painted Bluford Shops car. It received a base coat wash of Floquil weathered black paint then sealed with Testors Dull cote. Then, I created rust streaks with Winsor and Newton artist oil paints and a final spray of dull cote was applied to finish the model off. TRWBM.

Friday, January 1, 2016

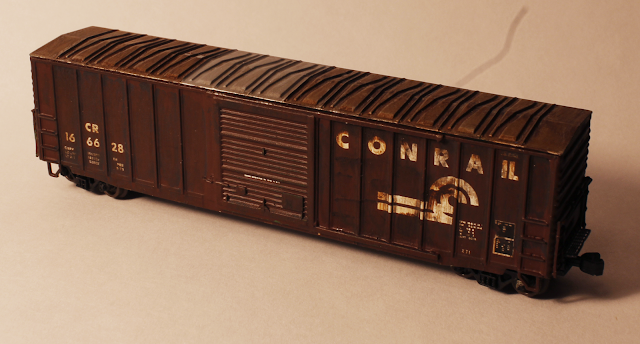
Completed Model Railroading Projects: Conrail X71 Class Boxcar in N scale

     The historical information that I was able gather about the X71 Class boxcars can be found on the Conrail Historical Society website, www.thecrhs.org. The X71 class boxcar that I am modeling comes from the 1000 car order that the Penn Central placed in 1971 with American Car Foundry. They were used for "clean" loading for items that needed to be ship in a disinfected environment or for paper items. These cars, being relatively new once Conrail started in 1976, had a long service life in the Conrail years and they could possibly be still in service after the Norfolk Southern/CSX split in the late 1990’s. 
   
     This boxcar started out as an Atlas Precision Design 50 foot boxcar painted in Burlington Northern. After coming across a photo of a similar boxcar in the X71 class with a Penn Central (PC) green door on it, I knew I had to model something similar to it. The project started off by removing the end mounted safety rails, food boards and brake wheel. The car was dipped in Scalecoat Paint Remover then washed with soap and water. It was set aside to dry for a day. Next, the car was painted with Floquil Tuscan Red, the sides and ends were painted but I left both doors alone at this time. Next came silver for the top of the car. Once dry, I chose to paint one door in PC green and the other in Tuscan Red to simulate a car that had damage to its original door and was replaced quickly at the nearest car shop on the Conrail system. There will always be a debate over with color matches what color in the model railroading hobby, with that said, I chose Model Master Russian Interior Green to represent the PC green. After the doors were painted and the model was dry it was sprayed with Testors Gloss cote. After some appropriate drying time for the clear cote, the car was decaled. The decals are from Microscale set number 60-1046, there is a lot of small lettering in this set. I highly recommend using a magnifier when working with N scale decals. Once the decaling was finished, the car received a layer of dull cote.


     Weathering for this car consists of enamel paint and artist oil paints. It started with a layer of Floquil weathered black being brushed on heavily and then quickly wiped away from top to bottom on all sides of the car, this technic creates a great base layer of grime for the next layer of rust. The car was again sprayed with dull cote to seal the enamel paint before the oil paint is applied. Oil paint rust is created with Winsor and Newton raw sienna and burnt umber. The darker of the two is first laid out in a horizontal line near the door tracks and then the lighter of the two is place in a line just underneath it. Then, using a wider brush, the two colors are streaked down to create a rust spot that has worn into the car from the harsh weather elements over the years. The roof got a similar treatment but a patch of silver was left new, to simulate a set of roof panels replaced. The car was then sealed for a final time with dull cote. TRWBM.

Sunday, December 20, 2015

Plastic Model Tips and Tricks: Photo Diorama- Jet Age Flight Line


     With this blog always expanding as I find more things about my hobbies to write about and share, I find that my photos of airplanes not in flight need more of a base to stand on. Instead of just placing them on a piece of neutral colored media, I came up with an idea to create a small easy to transport “flight line” for my jet age models. I first had some questions to answer myself before I came up with a plan of attach. The first area to cover was what size to make this little display stand, I only work with 1/72 scale aircraft; with that said, I had to for see what most aircraft space would take up on a simple display stand. Mostly I am looking at a one foot by one foot area of a foot print. Now, looking at the foot print of most landing gear area I foresee it being less than that. My decision was to go with a six inch by twelve inch plywood base and spot the aircraft at an angle to maximize the available space. This is only a general guess for me, I can see that some “big” planes won’t fit but I feel confident that this will work for most models I plan to build in the next few years.

     The build begins with a quick shopping at my local hobby shop for a piece of model aircraft grade plywood. I like this stuff because of its balance of strength and lightness. I decided to go with a ¼ inch piece that is six by twelve inches, I like the sturdiness of this size and it is not too small. Next, I need a 1/4-20 blind nut to act as my mount for my tripod, which will be used to hold the base as I take photos of the aircraft.
     Lastly, I need a sheet of Evergreen styrene of a thickness of .40 and a little over sized compared to my base. The rest of the supplies that I had on hand include, Prisma black color pencil, Tamiya deck tan, Tamiya gunmetal, Tamiya flat black spray, Tamiya grey primer, Plastruc diamond plate sheet, Durango Press HO scale manhole covers, Vallejo black wash, Testors Dullcote and Woodland Scenic yellow stripe dry transfers.
     Construction starts with finding the center of the board and drilling a 1/4 inch hole for the blind nut, once in place, it is then glued in with CA glue for added durability.

The styrene sheet (white) and diamond tread (tan)
It all begins here with making the tripod mount
The manhole covers are laid on the sheet for placement marking
     After the blind nut is in place, the holes for the manhole covers are created . Next, the styrene is laid out onto the wood and attached with Walthers Goo and allowed some time to dry. I left a little bit of space open where the Goo was placed for a diamond plated access hatch that is seen on some flight lines during the 1950’s and 1960’s along with room for two manhole access covers. 

     The opening for the diamond plate hatch is only an eye ball judgment and was around 1/2 inch by 1 inch. The plate was then cut and fitted into place onto the wood base and glued in with CA glue. The manhole covers were drilled and cut into place but I had to sand down the backs of the covers so they didn’t protrude too far above the plastic.

Openings for the manhole covers
   
     Next in the process is to pant the base to look like concrete. I chose Tamiya deck tan because of its look of aged concrete to represent a well-used flight line. The manhole covers were also painted during this time with Tamiya gunmetal. Once the paint was in place, it was allowed to dry for a couple days. As the days pasted, the project was continued with a smooth application of Testors Dulcoat to seal the paint for the next step. After a few minutes of drying, the next step was to draw in the simulated expansion lines into the concrete. This is achieved by making marks every two inches and made into two by two inch squares. I did this in angle to add visual interest and should be done with the aid of a metal straight edge to keep the lines straight and at the correct lengths.


After a quick spray of Tamiya primer, the
 Deck Tan color is applied to the diorama base
Once the Deck Tan color is applied the covers
were painted with Tamiya Gunmetal.


     Final few steps include, sealing the expansion lines again with Dullcote and then laying out the yellow guide line with Woodland Scenic dry transfers. The base is then sealed again with Dulcoat to protect the dry transfer. Next, a few “oil” spots are created with Vallejo black wash, and finally the whole base is sealed with Dullcote.
      To give the base a professional look, I sprayed the bottom and side of the base with Tamiya Matt Black spray. The top of the base was covered up with masking tape and a piece of a brown paper bag along with covering the blind nut opening to prevent the thread from not working properly. A word of caution; be sure to take time in masking up anything. The more time and care you take in masking off areas the less time you spend repainting the areas you didn’t want paint landing on.

   
     So there you have it, a nice photo diorama for my jet age airplanes for all to enjoy, this can be done in a weekend if you have an entire weekend free or in this case only a few spaced out days. Happy modeling everyone, TRWBM.

Sunday, September 13, 2015

Completed Plastic Models: Hasegawa 1/72 Republic P-47D Bubbletop

     The Republic P-47, as covered earlier in my blog with the razorback version, was America’s great workhorse for the Army Air Corps in World War Two. It’s engine, a powerful Prat and Whitney R2800 radial, had the muscle power to dogfight any enemy aircraft it came upon and with eight M2 Browning .50 Caliber machine guns, it also had the fire power up front to attack ground targets as well as enemy aircraft.


     This Hasegawa kit was bought a few years ago because of my purchase of Sky Models P-47 decal sheet. The sheet came with various nose arts of famous pilots, as seen with the other P47 on my blog, which grab my attention to because of the uniqueness of nose arts on airplanes. Also, I was inspired by the P-47 Bubbletop version at the United States Air Force Museum which has on display a recreation of Col. Joseph Laughlin’s famous aircraft Five by Five. He commanded the 362nd Fighter Group of the 9th Air Force in early 1945.


     The plane was sprayed in Tamiya aluminum and detail painted with Testor’s enamel for the red and yellow. The olive drab was achieved with Tamiya acrylic that was taped off after the aluminum had dried. As always, the model was cleared with a gloss coat, decaled, and dull coated. Similar to the other Hasegawa P-47 on this blog, the kit assembles very well and I can’t wait to tackle another one of these aircraft with some special nose art. TRWBM.

Wednesday, September 9, 2015

Completed Plastic Models: Academy 1/72 North American Rockwell OV-10 Bronco

     As the United States left the nineteen fifties it was apparent that the early Cold War idea of fighting the enemy with long range, unguided weapons was not the answer. Instead, a need was apparent in the end of the decade for an aircraft to perform counter-insurgency (COIN for short) and forward air command (FAC). At the dawn of nineteen sixty there was no aircraft able enough to meet those requirements, the fast F86 Sabre with its swept wing design was only a match for the Russian build Mig 15. The fighters of the fifties, F89, F94, etc. could not fly slow enough and or carry a payload capable of supporting ground troops or even loiter for a reasonable time.

     North American and Rockwell brought forth a joint design to meet the needs of COIN and FAC. Originally known as the NA-300 during the test trials, it beat out all of the other ten proposals from other airplane manufactures. The Bronco saw service in the US Navy, Air Force and Army during its service along with many foreign countries.


      The Academy 1/72 scale version is of the A model, an early variant. The kit assembled very nicely and a surprise for me since I have found many Academy kits to have poor fitting parts and crude detailing. The kits assemble starts as most do with the cockpit interior put together then the main fuselage halves are glued in place. Only two extra items were added to this otherwise out of box build, a single sidewinder from an Eduard set was added with a cover for the heat seeking sensor and also “remove before flight” tags from Eduard were also added. The airplane was hand painted and the gloss coated for decaling. The decals are from the kit and I had no struggle getting them to sit properly on the model. I chose to represent my aircraft as serial number 14694 (reversing the supplied number of 14649) of the 20th TASS (Tactical Air Support Squadron)/ 504th TASG (Tactical Air Support Group) stationed at Da Nang Air Base in South Vietnam in 1969. The model was then sprayed with Testors Dull coat and finally lightly weathered with Tamiya powders. I enjoyed this build like most of my builds; it is an inexpensive model for someone with a few kits under their belt to try out. TRWBM.